









 New features
Media Library Manager for networks, agencies and tidy libraries
Media Library Manager now works across a whole WordPress multisite and for agencies, and has a long list of new tools for any library: automatic optimisation, WebP and AVIF, folders, bulk editing, a page image audit, image licences and moving media between sites. Still free.
Safe on a multisite
Every site in the network is checked before a file is called unused, so a shared image is never deleted by mistake. Each site is scanned in turn on a schedule, upload quotas show on the network overview, settings can be set once with locks, and one weekly email covers the network.
For agencies
Clean up across the sites you choose with a preview first, give a client a report as a PDF or CSV, and run scans, cleanups and reports from WP-CLI. WP Offload Media is understood too.
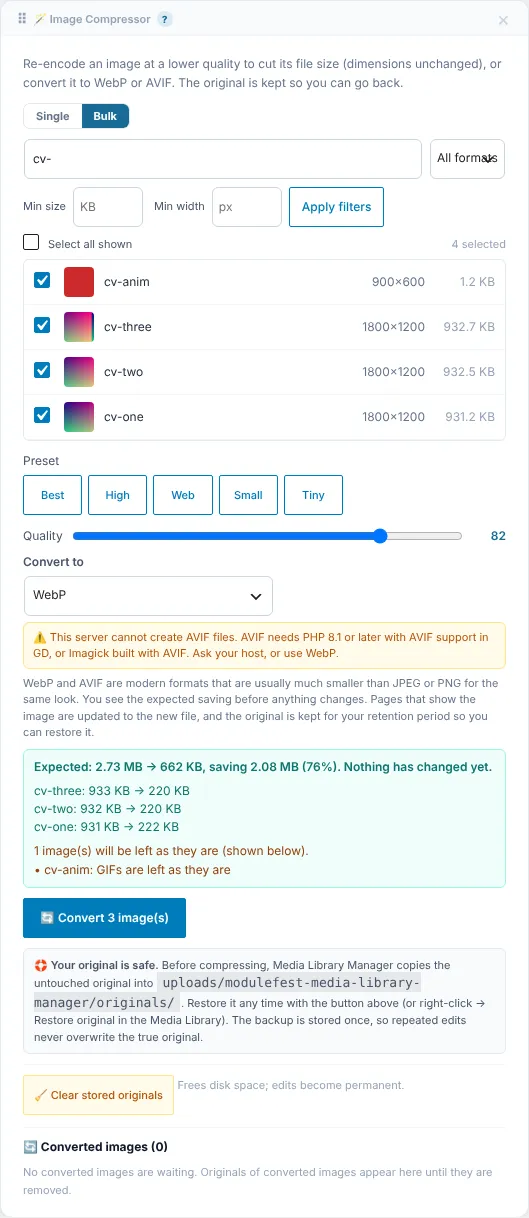
Smaller images, automatically
New uploads are resized and compressed as they arrive, and images can be converted to WebP or AVIF in bulk, with a way back.
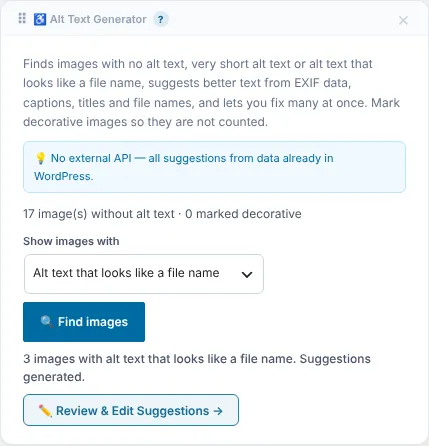
Alt text and broken images
Fix missing alt text in bulk, find pages pointing at images that no longer exist, and remove old image sizes nothing uses.
Folders, bulk editing and more
Folders inside the Media Library, bulk editing in a spreadsheet view with CSV import, a page image audit, image licences with expiry warnings, renames that update every link, and moving media to another site as a ZIP.
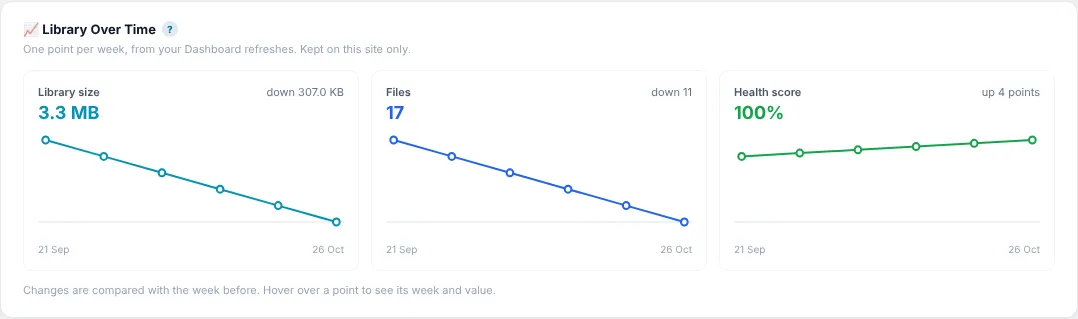
Your library over time
Charts of your library's size and health over time.
Versionshinweise
4.32.2November 13, 2026
Sie können jetzt mehrere Mediendetails in einer Tabellenansicht bearbeiten und Ihre Änderungen ganz einfach über eine CSV-Datei exportieren oder importieren. Sie finden diese Funktion unter Tools > Bulk Edit.
- Filtern und durchsuchen Sie Ihre Media Library und klicken Sie dann direkt in eine beliebige Zelle, um Titel, Alt-Texte, Beschriftungen, Beschreibungen oder Ordner zu aktualisieren.
- Klicken Sie auf den Button zum Speichern der Änderungen, um Ihre Aktualisierungen sofort anzuwenden.
- Verwenden Sie den Export-Button, um Ihre gefilterte Liste in eine Tabelle herunterzuladen, oder importieren Sie eine modifizierte CSV-Datei, um Ihre Mediathek nach Überprüfung der Vorschau im Bulk zu aktualisieren.
Sie können jetzt Ihre veröffentlichten Seiten und Beiträge überprüfen, um zu große Bilder zu finden und zu beheben, die Ihre Website verlangsamen. Gehen Sie zu Tools > Page Image Audit.
- Klicken Sie auf die Start-Schaltfläche, um Ihre veröffentlichten Inhalte zu überprüfen.
- Überprüfen Sie die Liste der Seiten, sortiert nach der gesamten Bildgröße, die Probleme wie zu große Abmessungen, fehlende Attribute oder fehlendes Lazy Loading anzeigt.
- Klicken Sie auf ein beliebiges Fundstück, um es zur Behebung in der Media Library zu öffnen.
- Verwenden Sie die Exportoption, um eine CSV-Datei Ihrer Ergebnisse herunterzuladen.
Sie können jetzt ganz einfach Bildquellen, Lizenzen, Nachweise und Ablaufdaten verfolgen, um unerwartete Urheberrechtsansprüche zu vermeiden. Sie finden diese Funktion unter Media > Image Licences und in Ihrem WordPress Dashboard.
- Bearbeiten Sie ein beliebiges Medienelement, um Quelle, Lizenztyp, Nachweis und Ablaufdatum hinzuzufügen.
- Zeigen Sie alle abgelaufenen oder unlizenzierten Bilder im Hauptverwaltungsbildschirm an und exportieren Sie sie bei Bedarf in eine CSV-Datei.
- Fügen Sie den bereitgestellten Shortcode zu einer beliebigen Seite hinzu, um automatisch die korrekten Bildnachweise für Ihre Bilder anzuzeigen.
Sie können Ihre Mediatheken jetzt ganz einfach zwischen Websites verschieben, wobei alle Titel, Alternativtexte, Ordner und Lizenzen intakt bleiben.
Sie finden dies unter Media > Tools.
- Wählen Sie Ihre Dateien oder Ordner aus und klicken Sie darauf, um sie als ZIP-Archiv herunterzuladen.
- Gehen Sie im Ziel-Site zum selben Menü und laden Sie Ihre ZIP-Datei hoch, um alles sicher zu importieren.
- Beobachten Sie den Fortschrittsbalken, während Ihre Dateien und Details automatisch wiederhergestellt werden.
4.31.2November 13, 2026
You can now sort your media into folders right in the Media Library.
Find them in Media › Library, in the Folders panel beside the grid.
- Click New folder and give it a name.
- Drag files onto the folder to move them there. To move several, use Bulk select first.
- Click a folder to see only its files, or Not in a folder for files you haven't sorted yet.
- Every media window, including Add media in the editor, has a Filter by folder list.
- Each file's details have a Folder choice, which also works on a phone.
- Folders never move files on your server, so no address changes.
You can now give your files readable names, which helps search engines, and every link is updated for you.
For one file, open it in Media › Library. For many, use Tools › Rename Files.
- Type a new name, or click Use the title or Use the alt text.
- Click Rename.
- The file and all its sizes are renamed, so a name like IMG_2041 becomes oak-dining-table.
- Links in your pages are updated automatically.
- Undo the rename puts the old name back.
You can now replace a file with a new version and keep its address, so every page shows the new one.
Open the file in Media › Library and click Replace file…, or use Tools › Replace File.
- Choose the new file.
- That's it: pages that use it now show the new version.
- With the same file type, the address stays exactly the same.
- If you swap one image type for another, links in your pages are updated.
- Undo the last replace puts the old file back, during your retention period.
You can now rebuild your image sizes, for example after changing your theme.
Find it in Tools › Regenerate Thumbnails.
- Choose Only images missing a size, All images or Images I choose.
- Click Regenerate and watch the progress bar.
- Read the report when it finishes.
- You can leave the page and press Resume the last run later.
- For one image, open it in Media › Library and click Regenerate sizes.
4.30.12November 12, 2026
You can now run scans, cleanups, and export reports directly using WP-CLI commands for easier site management. You can find documentation for these new commands in the Help Centre.
- Open your command line interface and connect to your server.
- Type the command for the action you want to perform, such as scanning your site, viewing your health score, listing unlinked files, cleaning up, or generating a report.
- Add the dry run option to test any cleanups safely before permanently moving items to the Recycle Bin.
You can now clean up old unused files across multiple network sites at once after previewing the changes.
Find this under Network Admin > Media Library Manager.
- Select your target sites and choose to move unused files older than a specific timeframe to the Recycle Bin.
- Click Preview to see how many files and how much space will be affected on each site, and review the lists.
- Click Move to send the files safely to each site's individual Recycle Bin, where they can still be restored if needed.
Site administrators can now move individual files to the recycle bin even when permanent deletion is locked.
Find this in Media > Library.
- Click on the file you want to remove.
- Select the option to move it to the recycle bin.
Additionally, network deletion locks now correctly block the permanent removal of broken records in the scanner.
4.30.10November 11, 2026
You can now automatically scan all sites on your network overnight so your media overview is always up to date.
Find this in Network Admin > Media Library Manager > Scheduled Scans.
- Select your preferred scan frequency from the dropdown menu.
- Save your changes to enable the automated background schedule.
The system will now process each site in small batches during off-peak hours without timing out. If any individual site fails to scan, the process will automatically move on to the next one.
You can now easily monitor and manage storage space across all sites in your network with new upload quota tracking.
Find this in Network Admin > Media Library Manager.
- View the exact storage used and total quota for each site in the new column.
- Quickly identify sites nearing capacity, as those using 80% or more of their limit are automatically highlighted.
- Click the column header to sort your sites by storage used and find where to clean up first.
You can now manage media settings across your entire network and lock specific options so individual sites must follow your rules.
Find this in Network Admin > Media Library Manager > Network Settings.
- Configure your retention periods, cleanup rules, and optimization preferences.
- Click the lock icon next to any setting you want to restrict from site administrators.
- Click Apply to all sites to push your configuration network-wide, ensuring new sites automatically inherit these rules.
You can now receive a single weekly email summarizing the status of your entire network instead of getting separate reports for every site.
Find this in Network Admin > Settings > Network Digest.
- Enter your preferred email address and choose your delivery day and time.
- Enable the network digest toggle to activate the report.
- Review the combined overview listing sites with unused files, high storage usage, missed scans, and dropped health scores directly from your inbox.
New: Client report for a site (PDF and CSV). You can now a monthly report for each client site of what Media Library Manager did, so that I can show clients the value of the work.
Edit this text so it says where to find it and the steps to use it.
You will no longer see unnecessary upgrade notices on your dashboard, ensuring a cleaner and smoother plugin management experience.
Go to Tools > Site Health to check your setup.
- Click on the Status tab to review your site health.
- Verify that all plugin warnings are now resolved.
4.30.5November 10, 2026
You can now safely clean up files on multisite networks without breaking images shared across different sites.
When running a deep scan on a network site, the scan now checks all other sites in your network to see if they are using the file. If another site uses it, the file stays protected and displays a link to the page where it appears.
Find this in your network dashboard under Media > File Manager.
- Select a site within your network.
- Start a deep scan.
- Review any shared files marked as used on another site.
4.30.4November 10, 2026
Media Library Manager now works across multisite networks and with WP Offload Media.
- Multisite: in Network Admin › Media Library Manager, every site is listed with its last scan, files, unused files and health, the most unused first. Press Open to go to that site's screen. The page only reads; each site is still scanned on its own.
- WP Offload Media and Amazon S3: files kept only in cloud storage show their real size, and the Dead Link Scanner no longer reports them as missing.
- Resize, compress, convert and backup before delete skip a file kept only in cloud storage and tell you why. The Duplicate Detector says how many files it could not compare.
The unused scan now finds images used in widgets and in Elementor Site Settings, so they are no longer listed as unused.
On Media Library Manager › Media Manager, the deep scan now also checks:
- Widgets in Appearance › Widgets: image, gallery, text, custom HTML and block widgets, including inactive ones.
- Elementor Site Settings, such as the site logo and backgrounds, and each page's own Elementor page settings.
A file found there shows Widget or Elementor Site Settings under where it is used. Run a new deep scan to update your list.
4.29.0November 2, 2026
New: As an accessibility-minded editor I can see which images have no alt text and fix them in bulk. You can now a list of images without alt text with a count, so that I can fix them quickly and keep my site accessible.
Edit this text so it says where to find it and the steps to use it.
4.28.1November 1, 2026
You can now convert your images to modern WebP or AVIF formats for faster page loads and easily restore the originals if something looks wrong.
Find this in Tools > Image Compressor.
- Open the Image Compressor and choose your target format.
- Select individual images or run a bulk conversion.
- Review the expected space savings before confirming.
- Access the Recycle Bin to restore any original images if needed.
4.27.0October 31, 2026
New: As a site owner I can see how my library size and health change over time. You can now a simple chart of my library size, file count and health score over the past weeks, so that I can see the benefit of cleaning up.
Edit this text so it says where to find it and the steps to use it.
4.26.0October 31, 2026
You can now have your new image uploads automatically resized and compressed to save space on your website.
You can find this feature in Media Manager > Settings & Stats.
- Toggle the setting to turn image optimization on.
- Enter your preferred maximum width, height, and compression quality.
- Save your changes.
New uploads larger than your chosen dimensions will now be automatically resized and compressed. Existing images in your library will not be altered.
4.25.0October 30, 2026
You can now easily find and fix posts and pages that contain broken images so your site always looks its best.
Find this new feature by going to Media Manager in your WordPress menu.
- Start a scan to check your published content for missing images.
- Review the list showing the page title, missing file, and location.
- Click the edit button to open the page editor and fix the image immediately, or export the full list to a CSV file.
4.24.0October 27, 2026
You can now easily free up disk space by removing old, unused image sizes left behind by previous themes.
Go to Tools.
- Run the scan to view a list of unused image sizes, including how many files each one uses and how much space they take up.
- Review the list, knowing your original images are always protected.
- Click to send the unused sizes to the size bin in one go or by individual size name.
- Confirm the deletion when prompted to safely reclaim your storage space.
ModuleFest Media Library Manager
Ihre Mediathek scannen, aufräumen, organisieren und sichern
Weitere Neuigkeiten
 Neue FunktionPet Groomer 2.77: Account credit and monthly billingManage advance payments and bill chosen clients just once a month.Was ist neu →
 Neue VersionModuleFest Pet Walker 2.771.222Kunden können jetzt im Voraus bezahlen und ihre Rechnungen über das Guthaben begleichen lassen. Außerdem in dieser Version: pay monthly in arrears: one invoice at the…Was ist neu →
 Neue VersionModuleFest Trades Business Manager 0.14.42Jobs, quotes, invoices and stock for tradesWas ist neu →